Acoustic emission testing
Acoustic emission testing purpose is to perform detection, positioning and monitoring of acoustic emission sources caused by surface discontinuity flaws or voulme flaws of a vessel, weld connection, parts and components.
Acoustic emission testing of the controlled object structure is performed only by means of strain state of the structure that causes acoustic emission within the controlled object structure. In order to do this, the tested object is exposed to impact of force, pressure, temperature, etc. Load impact type is selected depending on controlled object structure, operational environment and test type.
Acoustic emission testing: method description
Non-destructive testing (NDT) – is the control of properties and parameters of the tested object, which does not affect further use of the controlled object.
Traditional NDT methods (using ultrasonic waves, radiation and eddy-current) allow to find geometrical defects by means of emission of energy into the tested material structure. Acoustic emission testing implies a different approach: it is the tested material that serves as the source of the signal, i.e. it is a passive testing methos (while most of other testing methods are active). The second difference is that acoustic emission method allows to detect defect displacement instead of static uneveness caused by defects presence. That actually means that acoustic emission method enables detection of defects development (thus, preventing the most dangerous processes).
Expansion of a crack, layers formation, corrosion, hydrogen embbrittlement, liquid and gas leakage – all these processes result into acoustic emission, which can be detected and studied using this testing method.
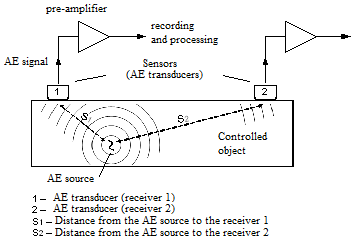
The figure below shows a scheme clarifying acoustic emission testing method.

Acoustic emission testing method
As the signal is detected by sensors number 1 and 2, signals time t1 and t2 are registered. The registered values of t1 and t2 allow to determine arrival time difference ∆t = t2 — t1. Then, using the known sound speed in the particular material and sensors coordinates, one can perform positioning of acoustic emission source (i.e. to find the defect). Sensors location and their number may be different. The more sensors are used, the more precise is the defect positioning.
Acoustic emission testing has a high sensitivity to growing defects – it allows to detect crack expansion with precision up to fraction of millimeter. Top sensitivity of acoustic emission instruments in theory is about 1×10⁻⁶ mm2, which corresponds to an increase of 1 µm crack by 1 µm.
As an imitation of acoustic emission source one can use piezoelectric transducer exposed to impact of electrical impulses of the generator. Frequency range of imitated impulse should correspond to control system frequency range. As an acoustic emission imitation one can also use Hsu-Nielsen source [graphite lead section, diameter – 0,3–0,5 mm, lead hardness – 2H].
Acoustic emission testing: special features
Key advantages of acoustic emission testing method (if compared to traditional NDT methods) are as follows:
Method integrity: using one or several sensors mounted on the object surface, one can control the entire object’s structure (100% control). This property of the mehod is especially important when it comes to control of object’s sections that are not easily accessible.
Unlike NDT methods using scanning process, acoustic emission method does not require controlled objet’s surface preliminary processing. Hence, control process performance and its results do not depend on tested object surface condition and processing method used. Insulating coating (if any) is to be removed only at sensors mounting area.
Detection and recording of developing defects allowing to classify not the size (or shape, position and direction) of the defects, but the degree of their potential hazard, i.e. their impact on controlled object’s integrity.
High performance, considerably exceeding that of traditional NDT methods (such as ultrasonic, radiographic, eddy-current or magnetic).
Possibility of remote implementation – remote control performance (operator’s station location can be far from that of the controlled object). This feature of the method enables its effective use for control (monitoring) of large-scale critical structures, large or hazard-prone facilities control while in operation without any danger to the personnel.
Possibility of technological process status control and object’s condition in real-time mode, allowing to prevent destruction of the controlled object.
Ultimate cost and operational effectiveness
Acoustic emission testing method feature that limits its application sphere is that it is difficult to separate acoustic emission signals from interference signals. This is caused by the fact that acoustic emission signals have noise-like nature, since the AE process is an accidental impulse forming process. AE signals have small amplitude, hence, it is difficult to separate useful signal from the interfernce signals. As the defect developes and its dimensions reach the critical value, AE signals amplitude and generation frequency are increasing, which facilitates probability of such AE source positioning.
Acoustic emission testing: application spheres
Acoustic emission testing method enables acquisition of large data flows, cost-effective control and extension of manufacturing facilities operational cycles, facilitates prediction of accidents and destruction processes. Acoustic emission testing method also has wide possibilities for application in materials, media and structures properties research. Nowadays it is already impossible to establish and operate critical technological facilities without implementation of acoustic emission testing method.
Acoustic emission testing method – basic application spheres:
- petroleum and chemical industry;
- tube-rolling and metallurgical facilities;
- thermal power and nuclear industry;
- railroad transportation;
- hoisting structures;
- bridge structures;
- aerospace products;
- concrete and reinforced concrete structures.
