Absolute calibration method
with the use of a laser displacement sensor
Absolute calibration method with the use of a laser displacement sensor requires complex and special equipment. Therefore, this method is not suitable for daily practice and is not used in daily calibration or current accelerometers verification.
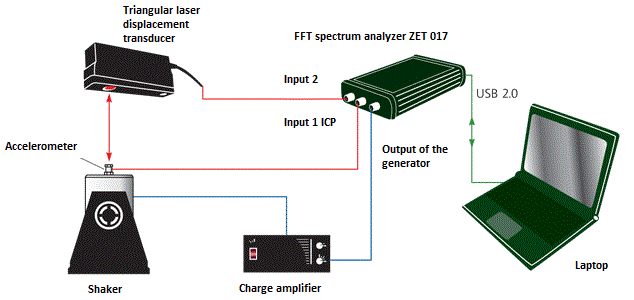
The system used by our company when absolute calibration of reference accelerometers is shown in Fig. 1. The main unit of this system is the laser triangulate displacement sensor. Light beam emitted by highly stabled laser is directed onto the upper surface of the body of accelerometer to be calibrated. The radiation scattered by the vibration sensor is collected on CCD-line. The signal processor calculates the distance to the accelerometer on the position of the light spot image on the CCD-line. Consequently spectrum analyzer captures vibration displacement of the verified accelerometer.

Figure 1
Sinusoidal signal is supplied on the shaker from a spectrum analyzer generator output through the power amplifier. The amplitude and frequency of the drive signal is adjusted to the desired value. Laser sensor is used for accurate determination of the displacement amplitude of mechanical vibrations of calibrated accelerometer. The corresponding acceleration is calculated based on the frequency of mechanical vibrations. The sensitivity of calibrated accelerometer is determined by dividing the measured value of the electrical signal given by the accelerometer to the value of mechanical vibrations calculated by ZETLab programs.
Note that, when calibration of reference AP10 accelerometers implemented by our company, specific reference values of frequency and acceleration of mechanical vibrations are taken into account, i.e. respectively 160 Hz and 10 m/s2.
Useful links
Adjusting the laser displacement sensors in ZETLab system
